Android Flexboxlayout使用详解,,首先Flexboxlay
Android Flexboxlayout使用详解,,首先Flexboxlay
对于学习React Native或者前端的同学肯定对Flexbox 的有所了解,因为这是前端领域CSS的一种布局方案,现在google也开源了类似前端Flexbox的项目叫Flexboxlayout,这样android也可以用Flexboxlayout实现类似前端Flexbox的布局。
首先Flexboxlayout有5大布局属性分别是flexDirection,flexWrap,justifyContent ,alignItems ,alignContent,这5个布局属性又对应着不同参数以实现不用的布局效果。具体如下:
1.flexDirection 属性决定主轴的方向(即项目的排列方向)。
对应的参数和效果图如下:
row(默认值):主轴为水平方向,起点在左端。
row-reverse:主轴为水平方向,起点在右端。
column:主轴为垂直方向,起点在上沿。
column-reverse:主轴为垂直方向,起点在下沿。
实例代码如下,而我们要改的是app:flexDirection来实现不同的效果。
<?xml version="1.0" encoding="utf-8"?>
<RelativeLayout
    xmlns:android="http://schemas.android.com/apk/res/android"
    xmlns:app="http://schemas.android.com/apk/res-auto"
    android:layout_width="match_parent"
    android:layout_height="match_parent">

    <com.google.android.flexbox.FlexboxLayout
        android:id="@+id/flexbox_layout"
        android:layout_width="match_parent"
        android:layout_height="wrap_content"
        app:flexDirection="row_reverse">

        <TextView
            android:id="@+id/textview1"
            android:layout_width="match_parent"
            android:layout_height="80dp"
            android:gravity="center"
            android:background="@color/color1"
            android:text="textview1"/>

        <TextView
            android:id="@+id/textview2"
            android:layout_width="match_parent"
            android:layout_height="80dp"
            android:gravity="center"
            android:background="@color/color2"
            android:text="textview2"/>

        <TextView
            android:id="@+id/textview3"
            android:layout_width="match_parent"
            android:layout_height="80dp"
            android:gravity="center"
            android:background="@color/color3"
            android:text="textview3"/>

        <TextView
            android:id="@+id/textview4"
            android:layout_width="match_parent"
            android:layout_height="80dp"
            android:gravity="center"
            android:background="@color/color4"
            android:text="textview4"/>

        <TextView
            android:id="@+id/textview5"
            android:layout_width="match_parent"
            android:layout_height="80dp"
            android:gravity="center"
            android:background="@color/color5"
            android:text="textview5"/>

        <TextView
            android:id="@+id/textview6"
            android:layout_width="match_parent"
            android:layout_height="80dp"
            android:gravity="center"
            android:background="@color/color5"
            android:text="textview6"/>

    </com.google.android.flexbox.FlexboxLayout>

</RelativeLayout>
1.当flexDirecition的参数为column时,即app:flexDirection="column":

flexDirection_column.PNG
2.当flexDirecition的参数为column时,即app:flexDirection="column_reverse":

flexDirection_column_reverse.PNG
3.当flexDirecition的参数为column时,即app:flexDirection="row":

flexDirection_row_reverse.PNG
4.当flexDirecition的参数为column时,即app:flexDirection="row_reverse":

flexDirecition_row.PNG
2.flexWrap在默认情况下 Flex 跟 LinearLayout 一样,都是不带换行排列的,但是flexWrap属性可以支持换行排列。对应的参数和效果图如下:
nowrap:不换行
wrap:按正常方向换行
wrap-reverse:按反方向换行
实例代码如下:
<?xml version="1.0" encoding="utf-8"?>
<RelativeLayout
    xmlns:android="http://schemas.android.com/apk/res/android"
    xmlns:app="http://schemas.android.com/apk/res-auto"
    android:layout_width="match_parent"
    android:layout_height="match_parent">

    <com.google.android.flexbox.FlexboxLayout
        android:id="@+id/flexbox_layout"
        android:layout_width="match_parent"
        android:layout_height="wrap_content"
        app:flexWrap="wrap">

        <TextView
            android:id="@+id/textview1"
            android:layout_width="80dp"
            android:layout_height="80dp"
            android:gravity="center"
            android:background="@color/color1"
            android:text="textview1"/>

        <TextView
            android:id="@+id/textview2"
            android:layout_width="100dp"
            android:layout_height="80dp"
            android:gravity="center"
            android:background="@color/color2"
            android:text="textview2"/>

        <TextView
            android:id="@+id/textview3"
            android:layout_width="80dp"
            android:layout_height="80dp"
            android:gravity="center"
            android:background="@color/color3"
            android:text="textview3"/>

        <TextView
            android:id="@+id/textview4"
            android:layout_width="150dp"
            android:layout_height="80dp"
            android:gravity="center"
            android:background="@color/color4"
            android:text="textview4"/>

        <TextView
            android:id="@+id/textview5"
            android:layout_width="100dp"
            android:layout_height="80dp"
            android:gravity="center"
            android:background="@color/color5"
            android:text="textview5"/>

        <TextView
            android:id="@+id/textview6"
            android:layout_width="80dp"
            android:layout_height="80dp"
            android:gravity="center"
            android:background="@color/color5"
            android:text="textview6"/>

    </com.google.android.flexbox.FlexboxLayout>

</RelativeLayout>
我们通过修改app:flexWrap="wrap"来实现不同的效果
1.当flexWrap的参数为wrap时,即app:flexWrap="wrap":

flexWrap_wrap.PNG
2.当flexWrap的参数为nowrap时,即app:flexWrap="nowrap":

flexWrap_nowrap.PNG
3.当flexWrap的参数为wrap_reverse时,即app:flexWrap="wrap_reverse":

flexWrap_wrap_reverse.PNG
3.justifyContent属性定义了项目在主轴上的对齐方式。看解释有点含糊,没关系,待会效果图一目了然,justifyContent对应的参数和含义如下:
flex_start(默认值):左对齐
flex-end:右对齐
center: 居中
space-between:两端对齐,项目之间的间隔都相等
space-around:每个项目两侧的间隔相等。所以,项目之间的间隔比项目与边框的间隔大一倍。
实例代码如下
<?xml version="1.0" encoding="utf-8"?><RelativeLayout
    xmlns:android="http://schemas.android.com/apk/res/android"
    xmlns:app="http://schemas.android.com/apk/res-auto"
    android:layout_width="match_parent"
    android:layout_height="match_parent">

    <com.google.android.flexbox.FlexboxLayout
        android:id="@+id/flexbox_layout"
        android:layout_width="match_parent"
        android:layout_height="match_parent"
        app:justifyContent="flex_start">

        <TextView
            android:id="@+id/textview1"
            android:layout_width="80dp"
            android:layout_height="80dp"
            android:gravity="center"
            android:background="@color/color1"
            android:text="textview1"/>

        <TextView
            android:id="@+id/textview2"
            android:layout_width="100dp"
            android:layout_height="80dp"
            android:gravity="center"
            android:background="@color/color2"
            android:text="textview2"/>

        <TextView
            android:id="@+id/textview3"
            android:layout_width="80dp"
            android:layout_height="80dp"
            android:gravity="center"
            android:background="@color/color3"
            android:text="textview3"/>

    </com.google.android.flexbox.FlexboxLayout></RelativeLayout>
1.当justifyContent的参数为flex_start时,即app:justifyContent="flex_start":

justifyContent-flex_start.PNG
2.当justifyContent的参数为flex_end时,即app:justifyContent="flex_end":

justifyContent-flex_end.PNG
3.当justifyContent的参数为center时,即app:justifyContent="center":

justifyContent-center.PNG
4.当justifyContent的参数为space_around时,即app:justifyContent="space_around":

justifyContent-space-around.PNG
5.当justifyContent的参数为space-between时,即app:justifyContent="space-between":

justifyContent-space_between.PNG
4.alignItems属性定义项目在副轴轴上如何对齐。(一般默认一般默认情况下,主轴是从左往右的直线,而对应的副轴就是从上忘下),alignItems对应的参数和含义如下:
flex-start:交叉轴的起点对齐。
flex-end:交叉轴的终点对齐。
center:交叉轴的中点对齐。
baseline: 项目的第一行文字的基线对齐。
stretch(默认值):如果项目未设置高度或设为auto,将占满整个容器的高度。
实例代码如下:
<?xml version="1.0" encoding="utf-8"?><RelativeLayout
    xmlns:android="http://schemas.android.com/apk/res/android"
    xmlns:app="http://schemas.android.com/apk/res-auto"
    android:layout_width="match_parent"
    android:layout_height="match_parent">

    <com.google.android.flexbox.FlexboxLayout
        android:id="@+id/flexbox_layout"
        android:layout_width="match_parent"
        android:layout_height="match_parent"
        app:alignItems="flex_start">

        <TextView
            android:id="@+id/textview1"
            android:layout_width="80dp"
            android:layout_height="80dp"
            android:gravity="center"
            android:background="@color/color1"
            android:text="textview1"/>

        <TextView
            android:id="@+id/textview2"
            android:layout_width="100dp"
            android:layout_height="80dp"
            android:gravity="center"
            android:background="@color/color2"
            android:text="textview2"/>

        <TextView
            android:id="@+id/textview3"
            android:layout_width="80dp"
            android:layout_height="80dp"
            android:gravity="center"
            android:background="@color/color3"
            android:text="textview3"/>

    </com.google.android.flexbox.FlexboxLayout></RelativeLayout>
1.当alignItems的参数为stretch时,即app:alignItems="stretch":

alignItems-stretch.PNG
2.当alignItems的参数为flex_start时,即app:alignItems="flex_start":

alignItems-flex_start.PNG
3.当alignItems的参数为flex_end时,即app:alignItems="flex_end":

alignItems-flex_end.PNG
4.当alignItems的参数为center时,即app:alignItems="center":

alignItems-center.PNG
5.当alignItems的参数为baseline时,即app:alignItems="baseline":

alignItems-baseline.PNG
5.alignContent属性定义了多根轴线的对齐方式。如果项目只有一根轴线,该属性不起作用,其属性如下:
flex-start:与交叉轴的起点对齐。
flex-end:与交叉轴的终点对齐。
center:与交叉轴的中点对齐。
space-between:与交叉轴两端对齐,轴线之间的间隔平均分布
space-around:每根轴线两侧的间隔都相等。所以,轴线之间的间隔比轴线与边框的间隔大一倍.
stretch(默认值):轴线占满整个交叉轴。
实例代码如下:
<?xml version="1.0" encoding="utf-8"?>
<RelativeLayout
    xmlns:android="http://schemas.android.com/apk/res/android"
    xmlns:app="http://schemas.android.com/apk/res-auto"
    android:layout_width="match_parent"
    android:layout_height="match_parent">

    <com.google.android.flexbox.FlexboxLayout
        android:id="@+id/flexbox_layout"
        android:layout_width="match_parent"
        android:layout_height="match_parent"
        app:flexWrap="wrap"
        app:alignContent="flex_start">

        <TextView
            android:id="@+id/textview1"
            android:layout_width="50dp"
            android:layout_height="80dp"
            android:gravity="center"
            android:background="@color/color1"
            android:text="textview1"/>

        <TextView
            android:id="@+id/textview2"
            android:layout_width="100dp"
            android:layout_height="80dp"
            android:gravity="center"
            android:background="@color/color2"
            android:text="textview2"/>

        <TextView
            android:id="@+id/textview3"
            android:layout_width="90dp"
            android:layout_height="80dp"
            android:gravity="center"
            android:background="@color/color3"
            android:text="textview3"/>

        <TextView
            android:id="@+id/textview4"
            android:layout_width="60dp"
            android:layout_height="80dp"
            android:gravity="center"
            android:background="@color/color1"
            android:text="textview4"/>

        <TextView
            android:id="@+id/textview5"
            android:layout_width="100dp"
            android:layout_height="80dp"
            android:gravity="center"
            android:background="@color/color2"
            android:text="textview5"/>

        <TextView
            android:id="@+id/textview6"
            android:layout_width="90dp"
            android:layout_height="80dp"
            android:gravity="center"
            android:background="@color/color3"
            android:text="textview6"/>

    </com.google.android.flexbox.FlexboxLayout>

</RelativeLayout>
1.当alignContent的参数为stretch时,即app:alignContent="stretch":

alignContent-stretch.PNG
2.当alignContent的参数为flex_start时,即app:alignContent="flex_start":

alignContent-flex_start.PNG
3.当alignContent的参数为flex_end时,即app:alignContent="flex_end":

alignContent-flex_end.PNG
4.当alignContent的参数为center时,即app:alignContent="center":

alignContent-center.PNG
5.当alignContent的参数为space_around时,即app:alignContent="space_around":

alignContent-space_around.PNG
6.当alignContent的参数为space_between时,即app:alignContent="space_between":

alignContent-space_between.PNG
除了这些主要属性之外,还有其他的属性:
layout_flexGrow(表示元素的权重属性)
<com.google.android.flexbox.FlexboxLayout
        android:layout_width="300dp"
        android:layout_height="wrap_content">

        <TextView
            android:layout_width="0dp"
            android:layout_height="48dp"
            android:background="@color/color1"
            app:layout_flexGrow="2"/>

        <TextView
            android:layout_width="0dp"
            android:layout_height="48dp"
            android:background="@color/color2"
            app:layout_flexGrow="1"/>
    </com.google.android.flexbox.FlexboxLayout>
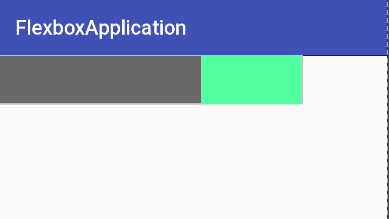
layout_flexGrow.PNG
2.layout_flexShrink(表示空间不足时子控件的缩放比例,0表示不缩放)
<com.google.android.flexbox.FlexboxLayout
        android:layout_width="300dp"
        android:layout_height="wrap_content">

        <TextView
            id="@+id/text1"
            android:layout_width="400dp"
            android:layout_height="48dp"
            app:layout_flexShrink="2"
            android:background="@color/color1"/>

        <TextView
            id="@+id/text2"
            app:layout_flexShrink="1"
            android:layout_width="300dp"
            android:layout_height="48dp"
            android:background="@color/color2"/>
    </com.google.android.flexbox.FlexboxLayout>
总的300dp因为宽度不足,所以text1就缩小原来的三分之二,text2缩小为原来的三分之一。
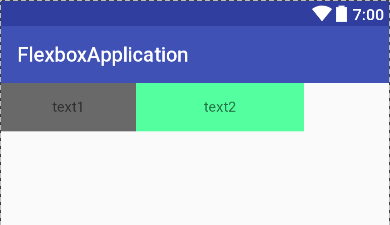
layout_flexShrink.PNG
3.layout_order(可以控制排列的顺序,负值在前,正值灾后,按照从小到大的顺序依次排列)
<com.google.android.flexbox.FlexboxLayout
        android:layout_width="match_parent"
        android:layout_height="wrap_content">

        <TextView
            android:layout_width="100dp"
            android:layout_height="48dp"
            app:layout_order="2"
            android:text="color1"
            android:gravity="center"
            android:background="@color/color1"/>

        <TextView
            android:layout_width="100dp"
            android:layout_height="48dp"
            app:layout_order="1"
            android:text="color2"
            android:gravity="center"
            android:background="@color/color2"/>

    </com.google.android.flexbox.FlexboxLayout>
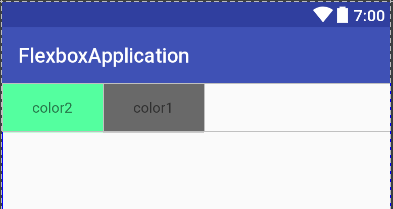
layout_order.PNG
4.layout_flexBasisPercent(属性定义了在分配多余空间之前,子元素占据的main size主轴空间,浏览器根据这个属性,计算主轴是否有多余空间。它的默认值为auto,即子元素的本来大小。)
<com.google.android.flexbox.FlexboxLayout
        android:layout_width="match_parent"
        android:layout_height="wrap_content"
        app:flexWrap="wrap">

        <TextView
            android:id="@+id/flexbox"
            android:layout_width="100dp"
            android:layout_height="100dp"
            android:text="text1"
            android:gravity="center"
            android:background="@color/color1"/>

        <TextView
            android:layout_width="100dp"
            android:layout_height="100dp"
            android:text="text2"
            android:gravity="center"
            app:layout_flexBasisPercent="50%"
            android:background="@color/color2"/>

    </com.google.android.flexbox.FlexboxLayout>

layout_flexBasisPercent.PNG
5.layout_alignSelf(属性允许单个子元素有与其他子元素不一样的对齐方式,可覆盖 alignItems 属性。默认值为auto,表示继承父元素的 alignItems 属性,如果没有父元素,则等同于stretch。),其参数如下:
auto (default)
flex_start
flex_end
center
baseline
stretch
<com.google.android.flexbox.FlexboxLayout
        android:layout_width="match_parent"
        android:layout_height="match_parent"
        app:alignItems="flex_start">

        <TextView
            android:layout_width="100dp"
            android:layout_height="100dp"
            android:text="text1"
            android:gravity="center"
            android:background="@color/color1"/>

        <TextView
            android:layout_width="100dp"
            android:layout_height="100dp"
            android:text="text2"
            android:gravity="center"
            app:layout_alignSelf="center"
            android:background="@color/color2"/>

        <TextView
            android:layout_width="100dp"
            android:layout_height="100dp"
            android:text="text2"
            android:gravity="center"
            android:background="@color/color3"/>

    </com.google.android.flexbox.FlexboxLayout>

layout_alignSelf.PNG
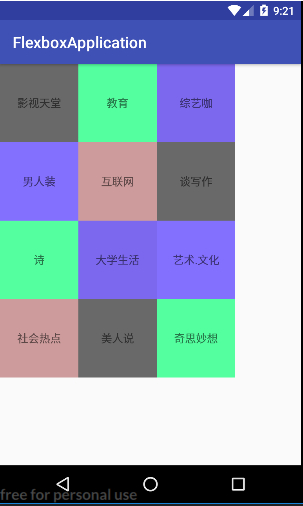
最后就是FlexboxLayoutManager,这也是最新FlexBoxLayout新出的功能,以前我们用流式布局的时候大部分不自己实现的话都是用第三方的库实现,现在有了这个就可以轻松的实现流式布局,并FlexboxLayoutManager
就像LinearLayoutManager等那样可以用RecyclerView加载,即可以不用一次全部加载又可以轻松加载多条数据。使用FlexboxLayoutManager很简单,跟一般的布局控制器没有区别,实例代码如下:
RecyclerView recycler_view=......
  FlexboxLayoutManager flexboxLayoutManager=new
  FlexboxLayoutManager(this);
  flexboxLayoutManager.setFlexWrap(FlexWrap.WRAP);
  recycler_view.setLayoutManager(flexboxLayoutManager);
  mainAdapter=new MainAdapter(this);
  recycler_view.setAdapter(mainAdapter);
我们通过FlexboxLayoutManager就可以设置FlexBoxLayout的各种属性,而上面的MainAdapter就是和普通的Adapter没区别。
作者:Jack921
用户评论