Android —— EventBus使用简介,Android10正式版
Android —— EventBus使用简介,Android10正式版
参考博客:https://blog.csdn.net/harvic880925/article/details/40660137
- EventBus简介
- EventBus有哪些优点
- Demo案例分享及问题解决
一、什么是EventBus
由greenboot组织贡献(该组织还贡献了greenDAO),一个Android事件发布/订阅轻量级框架。
EventBus可以代替Android传统的Intent,Handler,Broadcast或接口函数,在Fragment,Activity,Service线程之间传递数据,执行方法。
EventBus有五种线程模式分别是:
二、EventBus有哪些优点?
- 简化了组件间的通讯。
- 分离了事件的发送者和接受者。
- 在Activity、Fragment和线程中表现良好。
- 避免了复杂的和易错的依赖关系和生命周期问题。
- 使得代码更简洁,性能更好。
- 更快,更小(约50k的jar包)。
三、Demo案例分享及问题解决
下面用一个简单的例子介绍一下EventBus的使用,这个例子实现的功能是:有界面1、界面2、两个界面,界面1跳转到界面2,界面2返回界面1时,带回一个参数,并且在界面1中以Toast方式展现。

2. 定义事件:定义一个事件的封装对象。在程序内部就使用该对象作为通信的信息:
public class FirstEvent {

    private String strMsg;

    public FirstEvent(String strMsg) {
        this.strMsg = strMsg;
    }

    public String getStrMsg() {
        return strMsg;
    }
}
3. 注册EventBus : 我们要在接受消息的界面注册EventBus,界面1负责接受消息,我们将注册EventBus的代码放到界面1,(在onDestory中反注册)注册代码:
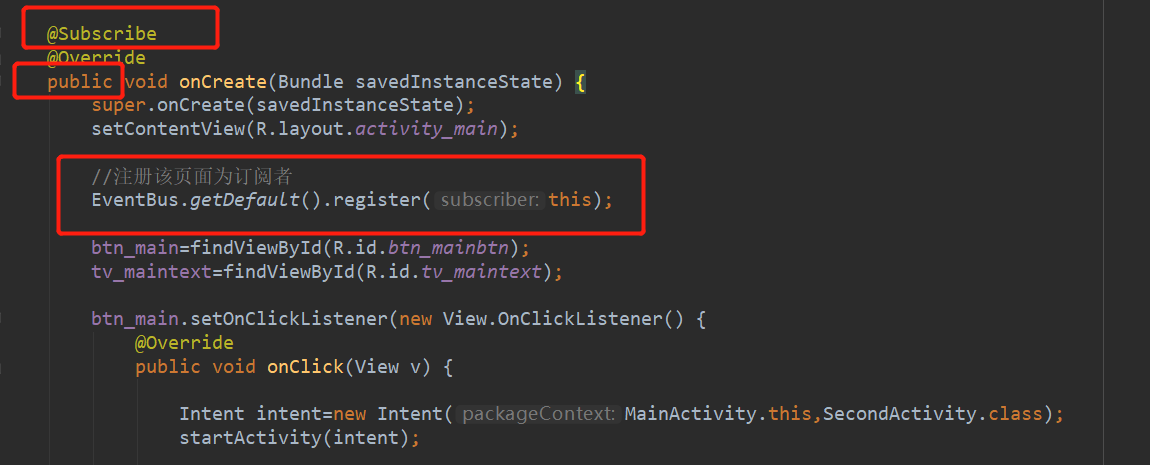
这里一定要注意:EventBus.getDefult().resgister(this);一定要在一个public方法内,而且方法前边一定加上注解:@Subscribe,否则会报错:org.greenrobot.eventbus.EventBusException:

4. 发送消息:使用EventBus中的Post方法来实现发送的,发送过去的是我们新建的类的实例(即第二步定义事件的实体类FirstEvent),发送消息在界面2,锁一在界面2中添加代码:
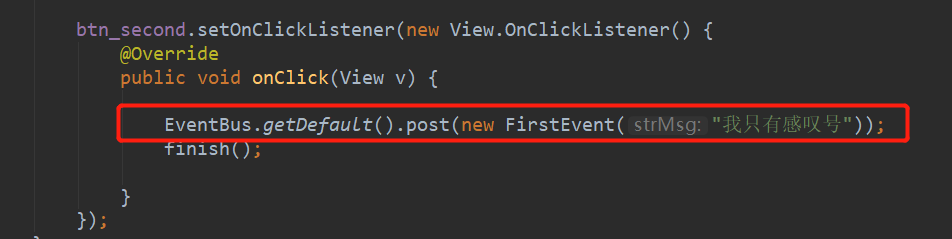
注意:红框部分一定加上,否则代码无效
5. 接收消息:在界面1中接收界面2返回的消息,需要在界面1中添加代码:

完整代码如下:界面1的xml文件和java文件:
<?xml version="1.0" encoding="utf-8"?>
<LinearLayout xmlns:android="http://schemas.android.com/apk/res/android"
    xmlns:app="http://schemas.android.com/apk/res-auto"
    xmlns:tools="http://schemas.android.com/tools"
    android:layout_width="match_parent"
    android:layout_height="match_parent"
    tools:context=".MainActivity">

    <TextView
        android:id="@+id/tv_maintext"
        android:text="小朋友  你是否有很多的问号?"
        android:layout_width="wrap_content"
        android:layout_height="wrap_content"/>
    <Button
        android:id="@+id/btn_mainbtn"
        android:layout_width="match_parent"
        android:text="主界面"
        android:layout_height="wrap_content"/>

</LinearLayout>
package com.cyf.mytestdemo;

import androidx.appcompat.app.AppCompatActivity;

import android.content.Intent;
import android.os.Bundle;
import android.util.Log;
import android.view.View;
import android.widget.Button;
import android.widget.TextView;
import android.widget.Toast;

import org.greenrobot.eventbus.EventBus;
import org.greenrobot.eventbus.Subscribe;
import org.greenrobot.eventbus.ThreadMode;

public class MainActivity extends AppCompatActivity {

    private Button btn_main;
    private TextView tv_maintext;

    @Subscribe
    @Override
    public void onCreate(Bundle savedInstanceState) {
        super.onCreate(savedInstanceState);
        setContentView(R.layout.activity_main);

        //注册该页面为订阅者
        EventBus.getDefault().register(this);

        btn_main=findViewById(R.id.btn_mainbtn);
        tv_maintext=findViewById(R.id.tv_maintext);

        btn_main.setOnClickListener(new View.OnClickListener() {
            @Override
            public void onClick(View v) {

                Intent intent=new Intent(MainActivity.this,SecondActivity.class);
                startActivity(intent);

            }
        });


    }

    @Subscribe(threadMode = ThreadMode.MAIN)
    public void onEventMainThread(FirstEvent event){
        Log.e("-----", "___________________________"+event.getStrMsg());
        Toast.makeText(this,event.getStrMsg(),Toast.LENGTH_SHORT).show();
    }


    @Override
    protected void onDestroy() {
        super.onDestroy();

        //反注册
        EventBus.getDefault().unregister(this);
    }
}
界面2的xml和java文件:
<?xml version="1.0" encoding="utf-8"?>
<LinearLayout xmlns:android="http://schemas.android.com/apk/res/android"
    xmlns:app="http://schemas.android.com/apk/res-auto"
    xmlns:tools="http://schemas.android.com/tools"
    android:layout_width="match_parent"
    android:layout_height="match_parent"
    tools:context=".SecondActivity">

    <Button
        android:id="@+id/btn_second"
        android:text="!!!!!"
        android:layout_width="wrap_content"
        android:layout_height="wrap_content"/>

</LinearLayout>
package com.cyf.mytestdemo;

import androidx.appcompat.app.AppCompatActivity;

import android.os.Bundle;
import android.view.View;
import android.widget.Button;

import org.greenrobot.eventbus.EventBus;

public class SecondActivity extends AppCompatActivity {

    private Button btn_second;

    @Override
    protected void onCreate(Bundle savedInstanceState) {
        super.onCreate(savedInstanceState);
        setContentView(R.layout.activity_second);

        btn_second=findViewById(R.id.btn_second);

        btn_second.setOnClickListener(new View.OnClickListener() {
            @Override
            public void onClick(View v) {

                EventBus.getDefault().post(new FirstEvent("我只有感叹号"));
                finish();

            }
        });
    }
}
相关文章
- 暂无相关文章
用户评论