iOS 裁剪工具,
投稿于 被查看 15800 次 评论:202
iOS 裁剪工具,
下载
demo和工具下载链接SPClipTool
使用说明
[[SPClipTool shareClipTool] sp_clipOriginImage:pickerImage complete:^(UIImage * _Nonnull image) {
    // 获取到裁剪后的image 后续操作
}];
需求
图片裁剪,效果如下图,支持图片拖拽,缩放,裁剪框自由变换大小。

思路
两个UIImageView,一个做背景,并加上蒙版效果,另外一个通过蒙版控制显示区域,并且保证两个UIImageView平移和缩放的时候完全重叠。最后使用一个UIView来做交互,绘制三分网格线(专业术语我不知道叫啥,截图时一个参照,2/3 ≈0.667 接近黄金比0.618)。
注意
- 坐标系转换问题。
- mask灵活使用问题。
手势的处理和三分网格线绘制的时候,计算线条宽度和长度需要特别注意。
为了增强用户体验,在裁剪框边缘交互设计的时候,注意额外增加用户的可操控范围。
实现
- 初始化两个UIImageView,一个做背景图(backgroudImageView),一个用来显示裁剪区域(clipImageView),拖拽手势加到了clipImageView。
- (void)setupImageView {
    // backgroudImageView
    UIImageView *backgroudImageView = [[UIImageView alloc] initWithFrame:self.view.bounds];
    backgroudImageView.contentMode = UIViewContentModeScaleAspectFit;
    backgroudImageView.image = self.originImage;
    [self.view addSubview:backgroudImageView];
    self.backgroudImageView = backgroudImageView;
    backgroudImageView.layer.mask = [[CALayer alloc] init];
    backgroudImageView.layer.mask.frame = backgroudImageView.bounds;
    backgroudImageView.layer.mask.backgroundColor = [UIColor colorWithWhite:1 alpha:0.5].CGColor;

    // clipImageView
    UIImageView *clipImageView = [[UIImageView alloc] initWithFrame:backgroudImageView.frame];
    clipImageView.userInteractionEnabled = YES;
    clipImageView.image = backgroudImageView.image;
    clipImageView.contentMode = backgroudImageView.contentMode;
    [self.view addSubview:clipImageView];
    self.clipImageView = clipImageView;
    clipImageView.layer.mask = [[CALayer alloc] init];
    clipImageView.layer.mask.backgroundColor = [UIColor whiteColor].CGColor;
    clipImageView.layer.mask.borderColor = [UIColor whiteColor].CGColor;
    clipImageView.layer.mask.borderWidth = 1;
    [clipImageView.layer.mask removeAllAnimations];

    UIPanGestureRecognizer *panGesture = [[UIPanGestureRecognizer alloc] initWithTarget:self action:@selector(imagePan:)];
    [clipImageView addGestureRecognizer:panGesture];
}- 初始化用于裁剪交互的SPClipView
- (void)setupClipView {
    SPClipView *clipView = [[SPClipView alloc] init];
    clipView.backgroundColor = [UIColor clearColor];
    // 打开下面两行注释,可以查看真实clipView的大小。
//    clipView.layer.borderColor = [UIColor whiteColor].CGColor;
//    clipView.layer.borderWidth = 1;
    [self.view addSubview:clipView];
    self.clipView = clipView;
    // 获取真实frame
    dispatch_after(dispatch_time(DISPATCH_TIME_NOW, (int64_t)(0.1 * NSEC_PER_SEC)), dispatch_get_main_queue(), ^{
        clipView.frame = CGRectMake(0, 0, self.view.width / 1.5, self.view.height / 1.5);
          clipView.center = self.view.center;
        self.backgroudImageView.frame = self.view.bounds;
        self.clipImageView.frame = self.backgroudImageView.frame;
        [self dealMask];
    });

    UIPanGestureRecognizer *panGesture = [[UIPanGestureRecognizer alloc] initWithTarget:self action:@selector(clipPan:)];
    [clipView addGestureRecognizer:panGesture];

    UIPinchGestureRecognizer *pinchGesture = [[UIPinchGestureRecognizer alloc] initWithTarget:self action:@selector(pinchGestureAction:)];
    [self.view addGestureRecognizer:pinchGesture];
}- 手势处理
#pragma mark- UIPanGestureRecognizer
- (void)clipPan:(UIPanGestureRecognizer *)panGesture {
    CGPoint point = [panGesture translationInView:self.clipView];
    self.clipView.origin = [self.clipView convertPoint:point toView:self.view];
    [self expandClipView:panGesture];
    [self dealGuideLine:panGesture];
    [self dealMask];
    [panGesture setTranslation:CGPointMake(0, 0) inView:self.view];
}

- (void)imagePan:(UIPanGestureRecognizer *)panGesture {
    CGPoint point = [panGesture translationInView:self.clipImageView];
    self.clipImageView.origin = [self.clipImageView convertPoint:point toView:self.view];
    self.backgroudImageView.center = self.clipImageView.center;
    [self dealGuideLine:panGesture];
    [self dealMask];
    [panGesture setTranslation:CGPointMake(0, 0) inView:self.view];
}

#pragma mark- UIPinchGestureRecognizer
- (void)pinchGestureAction:(UIPinchGestureRecognizer *)pinchGesture {
    switch (pinchGesture.state) {
        case UIGestureRecognizerStateBegan: {
            if (lastScale <= minScale) {
                lastScale = minScale;
            }else if (lastScale >= maxScale) {
                lastScale = maxScale;
            }
            self.clipImageViewCenter = self.clipImageView.center;
            self.clipView.showGuideLine = YES;
        }
        case UIGestureRecognizerStateChanged: {
            CGFloat currentScale = lastScale + pinchGesture.scale - 1;
            if (currentScale > minScale && currentScale < maxScale) {
                [self dealViewScale:currentScale];
            }
        }
            break;
        case UIGestureRecognizerStateEnded:
            lastScale += (pinchGesture.scale - 1);
            self.clipView.showGuideLine = NO;
            [self.clipView setNeedsDisplay];
        default:
            break;
    }
}

#pragma mark- Action
- (void)dealViewScale:(CGFloat)currentScale {
    self.clipImageView.width = currentScale * self.view.width;
    self.clipImageView.height = currentScale * self.view.height;
    self.clipImageView.center = self.clipImageViewCenter;
    self.backgroudImageView.frame = self.clipImageView.frame;
    self.backgroudImageView.layer.mask.frame = self.backgroudImageView.bounds;
    [self.backgroudImageView.layer.mask removeAllAnimations];
    [self dealMask];
}

- (void)expandClipView:(UIPanGestureRecognizer *)panGesture {
    CGPoint point = [panGesture translationInView:self.clipImageView];
    CGFloat margin = 60;
    CGFloat minValue = margin;
    if (panGesture.numberOfTouches) {
        CGPoint location = [panGesture locationOfTouch:0 inView:panGesture.view];
        if (location.x < margin) {
            self.clipView.width = MAX(self.clipView.width -= point.x, minValue);
        }
        if ((self.clipView.width - location.x) < margin) {
            self.clipView.frame = CGRectMake(self.clipView.x - point.x, self.clipView.y, self.clipView.width + point.x, self.clipView.height);
        }
        if (location.y < margin) {
            self.clipView.height = MAX(self.clipView.height -= point.y, minValue);
        }
        if ((self.clipView.height - location.y) < margin) {
            self.clipView.frame = CGRectMake(self.clipView.x , self.clipView.y - point.y, self.clipView.width, self.clipView.height + point.y);
        }
    }
}

- (void)dealGuideLine:(UIPanGestureRecognizer *)panGesture  {
    switch (panGesture.state) {
        case UIGestureRecognizerStateBegan:
            self.clipView.showGuideLine = YES;
            break;
        case UIGestureRecognizerStateEnded:
            self.clipView.showGuideLine = NO;
            break;
        default:
            break;
    }
}

- (void)dealMask {
    // 额外增加拖拉区域 增强边缘手势体验
    CGFloat margin = 30;
    CGRect rect = [self.view convertRect:self.clipView.frame toView:self.clipImageView];
    self.clipImageView.layer.mask.frame = CGRectMake(rect.origin.x + margin, rect.origin.y + margin, rect.size.width - 2 * margin, rect.size.height - 2 * margin);
    [self.clipView setNeedsDisplay];
    [self.clipImageView.layer.mask removeAllAnimations];
}- 图片裁剪
- (void)clipImage {

    CGSize size = self.view.bounds.size;
    UIGraphicsBeginImageContextWithOptions(size, NO, [UIScreen mainScreen].scale);
    [self.view drawViewHierarchyInRect:self.view.bounds afterScreenUpdates:NO];
    UIImage *image = UIGraphicsGetImageFromCurrentImageContext();
    CGImageRef cgImage = [image CGImage];
    CGRect rect = [self.clipImageView convertRect:self.clipImageView.layer.mask.frame toView:self.view];

    // 边框线条宽度值
    CGFloat borderW = 1;
    CGImageRef cgClipImage = CGImageCreateWithImageInRect(cgImage, CGRectMake((rect.origin.x + borderW / 2) * image.scale, (rect.origin.y + borderW / 2) * image.scale, (rect.size.width - borderW) * image.scale, (rect.size.height - borderW) * image.scale));
    UIGraphicsEndImageContext();
    if (self.complete) {
        self.complete([UIImage imageWithCGImage:cgClipImage]);

    }
    [self dismissViewControllerAnimated:YES completion:nil];
}
裁剪区域绘制
在这里,裁剪区域的矩形框我并没有直接采用clipView的fram大小,而是在其内部绘制了一个矩形框,为了让用户在调节边缘的时候更灵活,不然只有当手指在边框内部边缘才能触发调节边框大小的事件。如下图,可以看到clipView真实的大小(外框)。

@implementation SPClipView
- (void)drawRect:(CGRect)rect {
// Drawing code
CGContextRef currentContext = UIGraphicsGetCurrentContext();
CGContextSetStrokeColorWithColor(currentContext, [UIColor whiteColor].CGColor);
CGContextSetLineWidth(currentContext, 1);
// 额外增加拖拉区域 增强边缘手势体验,该值应该和上文- (void)dealMask;方法中的margin一致
CGFloat margin = 30;
// 绘制矩形框
CGContextAddRect(currentContext, CGRectMake(margin, margin, self.width - 2 * margin, self.height - 2 * margin));
CGContextStrokePath(currentContext);
// 绘制三分线
CGFloat maskW = self.width - 2 * margin;
CGFloat maskH = self.height - 2 * margin;
CGContextSetLineWidth(currentContext, 0.5);
if (self.showGuideLine) {
CGContextSetStrokeColorWithColor(currentContext, [UIColor whiteColor].CGColor);
}else {
CGContextSetStrokeColorWithColor(currentContext, [UIColor clearColor].CGColor);
}
CGContextMoveToPoint(currentContext, margin, maskH / 3 + margin);
CGContextAddLineToPoint(currentContext, self.width - margin, maskH / 3 + margin);
CGContextMoveToPoint(currentContext, margin, 2 / 3.0 * maskH + margin);
CGContextAddLineToPoint(currentContext, self.width - margin, 2 / 3.0 * maskH + margin);
CGContextMoveToPoint(currentContext, maskW / 3 + margin, margin);
CGContextAddLineToPoint(currentContext, maskW / 3+ margin, self.height - margin);
CGContextMoveToPoint(currentContext, 2 / 3.0 * maskW + margin, margin);
CGContextAddLineToPoint(currentContext, 2 / 3.0 * maskW + margin, self.height - margin);
CGContextStrokePath(currentContext);
// 绘制四角
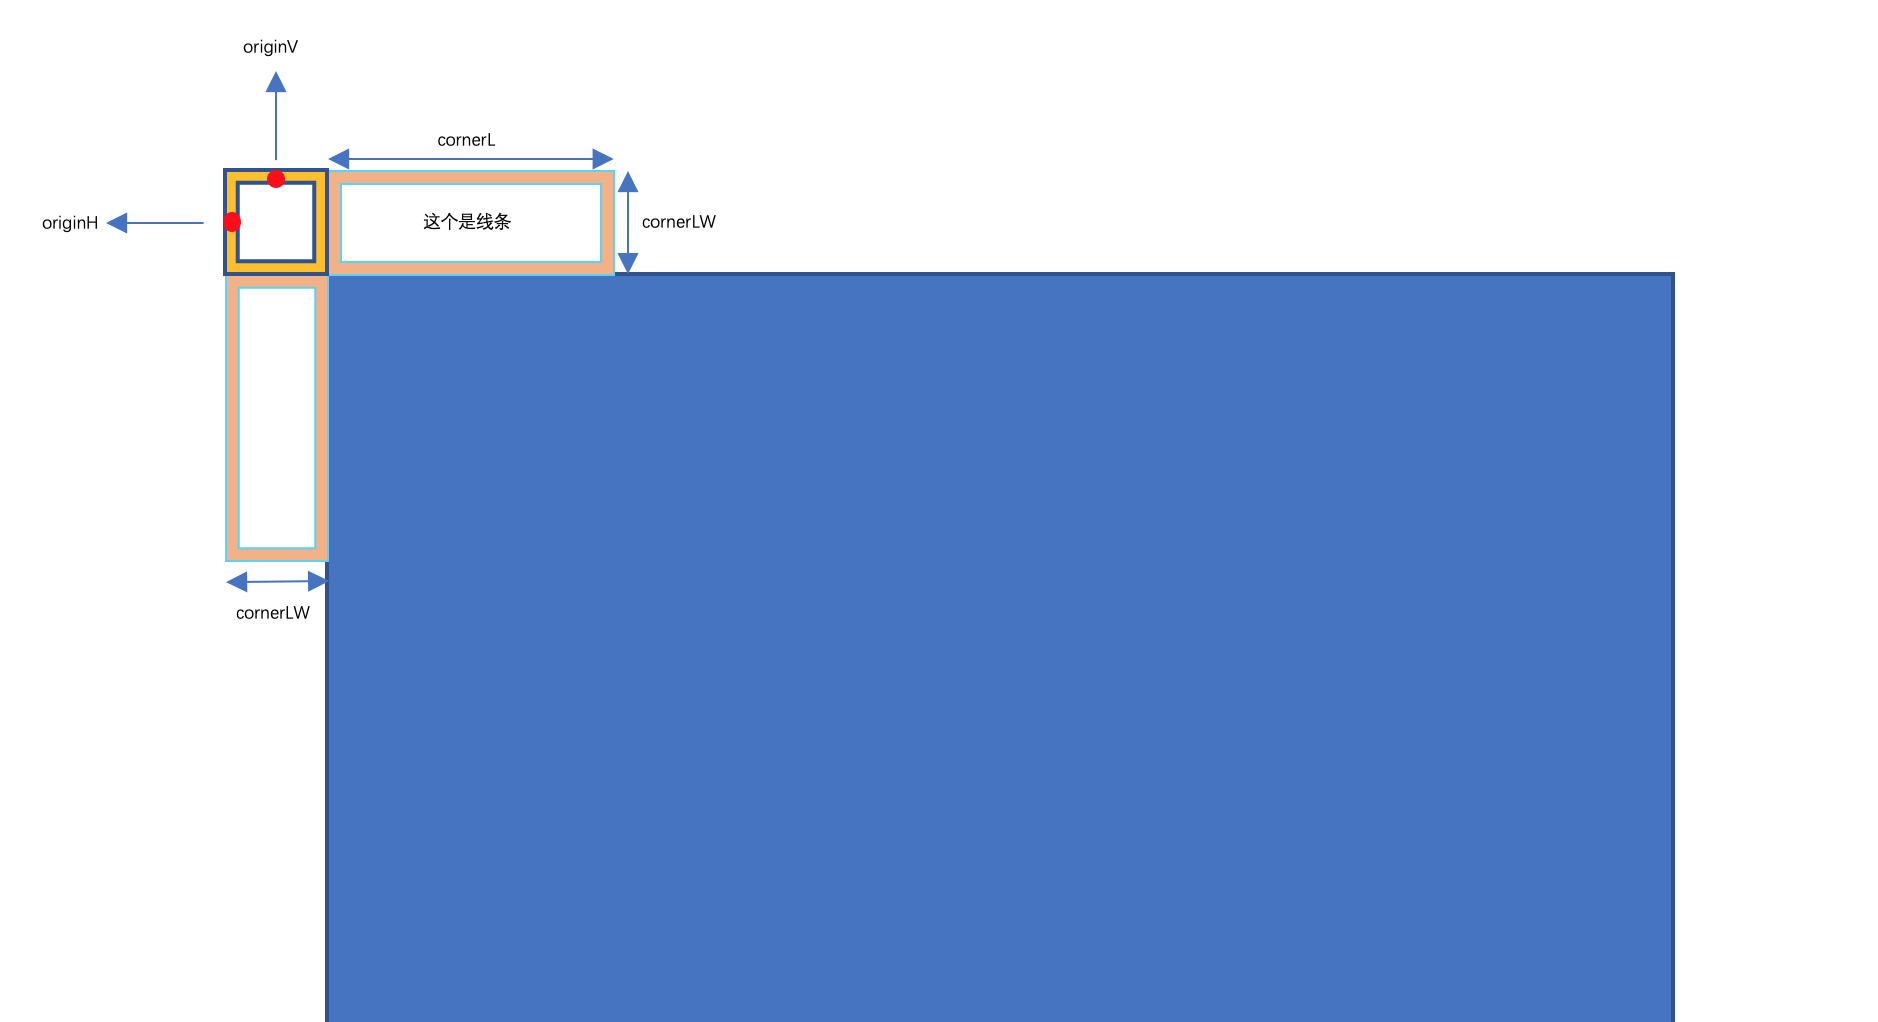
CGFloat cornerL = 15;
CGFloat cornerLW = 2;
// 实际的长度
CGFloat cornerRL = cornerL + cornerLW;
CGPoint originH = CGPointMake(margin - cornerLW, margin - cornerLW / 2);
CGPoint originV = CGPointMake(margin - cornerLW / 2, margin - cornerLW);
CGContextSetStrokeColorWithColor(currentContext, [UIColor whiteColor].CGColor);
CGContextSetLineWidth(currentContext, cornerLW);
// 左上
CGContextMoveToPoint(currentContext, originH.x, originH.y);
CGContextAddLineToPoint(currentContext, originH.x + cornerRL, originH.y);
CGContextMoveToPoint(currentContext, originV.x, originV.y);
CGContextAddLineToPoint(currentContext, originV.x, originV.y + cornerRL);
// 左下
CGContextMoveToPoint(currentContext, originH.x, originH.y + maskH + cornerLW);
CGContextAddLineToPoint(currentContext, originH.x + cornerRL, originH.y + maskH + cornerLW);
CGContextMoveToPoint(currentContext, originV.x, originV.y + maskH + 2 * cornerLW);
CGContextAddLineToPoint(currentContext, originV.x, originV.y + maskH + 2 * cornerLW - cornerRL);
// 右上
CGContextMoveToPoint(currentContext, originH.x + maskW + 2 * cornerLW, originH.y);
CGContextAddLineToPoint(currentContext, originH.x + maskW + 2 * cornerLW - cornerRL, originH.y);
CGContextMoveToPoint(currentContext, originV.x + maskW + cornerLW, originV.y);
CGContextAddLineToPoint(currentContext, originV.x + maskW + cornerLW, originV.y + cornerRL);
// 右下
CGContextMoveToPoint(currentContext, originH.x + maskW + 2 * cornerLW, originH.y + maskH + cornerLW);
CGContextAddLineToPoint(currentContext, originH.x + maskW + 2 * cornerLW - cornerRL, originH.y + maskH + cornerLW);
CGContextMoveToPoint(currentContext, originV.x + maskW + cornerLW, originV.y + maskH + 2 * cornerLW);
CGContextAddLineToPoint(currentContext, originV.x + maskW + cornerLW, originV.y + maskH + 2 * cornerLW - cornerRL);
CGContextStrokePath(currentContext);
}这里一定要注意线条的宽度,线条是有宽度的,绘制路径位于线条的中心位置。
相关文章
- 暂无相关文章
用户评论