Swift如何为设置中心添加常用功能,swift中心添加
Swift如何为设置中心添加常用功能,swift中心添加
前言
在我们开发所有的应用中,通常会提供包含多项功能的设置中心。这些功能可以包括,给用户推荐自己的其他作品、邀请用户好评、提供反馈通道、邀请用户分享应用、打开官网或某些其他地址。 这些功能虽然用户使用频率不高,但对于应用的设置中心是必备的。
1.跳转到AppStore,邀请好评或推荐其他应用
2.提供系统邮件反馈通道
3.调取系统分享功能分享应用
4.在应用内打开网页,实现官方网址、应用更新说明或打开其他网址
通常设置中心由TableView或CollectionView创建,在didSelectRowAt中添加不同的点击反馈即可,这里就不再描述。
一、跳转到AppStore
应用内跳转到AppStore可以通过设置对应的应用地址即可,因此可以跳转到其他应用界面实现推荐应用,也可以跳转到自身应用的地址邀请用户好评。OneX系列产品都拥有推荐和评价的入口,两种入口的实现方式也都是一样的。 在不同的情况下我们只需要改变urlString末尾的ID即可,当让也可以封装在某一个函数中,通过参数进行改变具体的跳转地址。
let urlString = "itms-apps://itunes.apple.com/app/id1250290965"
if let url = URL(string: urlString) {
 //根据iOS系统版本,分别处理
 if #available(iOS 10, *) {
 UIApplication.shared.open(url, options: [:],
     completionHandler: {
     (success) in
 })
 } else {
 UIApplication.shared.openURL(url)
 }
}

二、邮件反馈功能
第一,需要导入框架MessageUI.framework,在项目设置Build Phases的Link Binary With Libraries中添加MessageUI.framework。 第二,在使用邮件反馈功能的页面文件中导入头文件import MessageUI。 第三,给所在Controller加上协议MFMailComposeViewControllerDelegate。
完成以上步骤之后,我们就可以开始写具体的使用代码了。 发送反馈邮件时,为了方便我们收到邮件时辨别是用户发来的反馈邮件,同时了解用户的系统、版本等信息,我们在发送函数中设置好标题与默认正文。 mailComposeVC.setToRecipients中添加收件邮箱地址,mailComposeVC.setSubject中添加邮件标题,mailComposeVC.setMessageBody设置正文内容。
//邮件发送函数
func configuredMailComposeViewController() -> MFMailComposeViewController {

 let mailComposeVC = MFMailComposeViewController()
 mailComposeVC.mailComposeDelegate = self

 //获取设备信息
 let deviceName = UIDevice.current.name
 // let deviceModel = UIDevice.current.model
 let systemVersion = UIDevice.current.systemVersion
 let deviceUUID = UIDevice.current.identifierForVendor?.uuidString

 //获取APP信息
 let infoDic = Bundle.main.infoDictionary
 // 获取App的版本号
 let appVersion = infoDic?["CFBundleShortVersionString"] ?? "appVersion"
 // 获取App的build版本
 let appBuildVersion = infoDic?["CFBundleVersion"] ?? "appBuildVersion"
 // 获取App的名称
 let appName = infoDic?["CFBundleDisplayName"] ?? "OneClock"

 //设置邮件地址、主题及正文
 mailComposeVC.setToRecipients(["<xdehang@gmail.com>"])
 mailComposeVC.setSubject("OneScreen "+String(describing: appVersion)+" - "+NSLocalizedString("FeedBack Mail From", comment: "FeedBack Mail From")+" "+deviceName)

 let content:String = "\n \n \n \n Device:\(deviceName)\n System:\(systemVersion)\n App Version:\(String(describing: appVersion))"

 mailComposeVC.setMessageBody(NSLocalizedString("<Start To Write Mail>", comment: "<Start To Write Mail>")+content, isHTML: false)
 return mailComposeVC
}
再需要添加邮件系统提示和邮件发送检测。
//邮件系统提示
func showSendMailErrorAlert() {
 let sendMailErrorAlert = UIAlertController(title: NSLocalizedString("Unable To Send", comment: "Unable To Send"), message: NSLocalizedString("Your device has not been set up, please set in the mail application and then try to send.", comment: "Your device has not been set up, please set in the mail application and then try to send."), preferredStyle: .alert)
 sendMailErrorAlert.addAction(UIAlertAction(title: NSLocalizedString("Confirm", comment: "Confirm action title"), style: .default) { _ in })
 self.present(sendMailErrorAlert, animated: true){}

}
//邮件发送检测
func mailComposeController(_ controller: MFMailComposeViewController, didFinishWith result: MFMailComposeResult, error: Error?) {

 switch result.rawValue {
 case MFMailComposeResult.cancelled.rawValue:
 print("取消发送")
 case MFMailComposeResult.sent.rawValue:
 print("发送成功")
 default:
 break
 }
 self.dismiss(animated: true, completion: nil)
}
最后我们在调用邮件反馈的地方,需要先判断是否能够发送,如果不能发送通过提示信息告诉用户失败原因,如果可以发送将成功调取发送窗口。 在需要邮件反馈的地方:
if MFMailComposeViewController.canSendMail() {
 //注意这个实例要写在if block里,否则无法发送邮件时会出现两次提示弹窗(一次是系统的)
 let mailComposeViewController = configuredMailComposeViewController()
 self.present(mailComposeViewController, animated: true, completion: nil)

} else {
 self.showSendMailErrorAlert()
}

三、系统分享功能
分享前,我们需要设置好分享的信息:标题、图片、链接。
var webUrl:String = "https://itunes.apple.com/cn/app/id1355476695"
var urlTitle:String = "OneScreen"
var urlImage:UIImage = #imageLiteral(resourceName: "onescreen_icon")
这里使用了var,是为了在特殊情况下改变他们的值,具体的调用方式如下:
let shareVC:UIActivityViewController = UIActivityViewController(activityItems: [self.urlTitle,self.urlImage,self.webUrl], applicationActivities: nil)

self.present(shareVC, animated: true, completion: {
 print("shareVC success")
})

四、打开某些网址
打开网址可以实现“官方网址”、“应用更新说明”功能,更新说明我们可以通过更新Web内容快速高速用户更新列表。如果你的应用需要比较多的教程,也可以通过网页的形式展现。为了方便用户反馈,我通常会增加一个微博入口,让用户打开微博地址快速与我联系进行反馈。
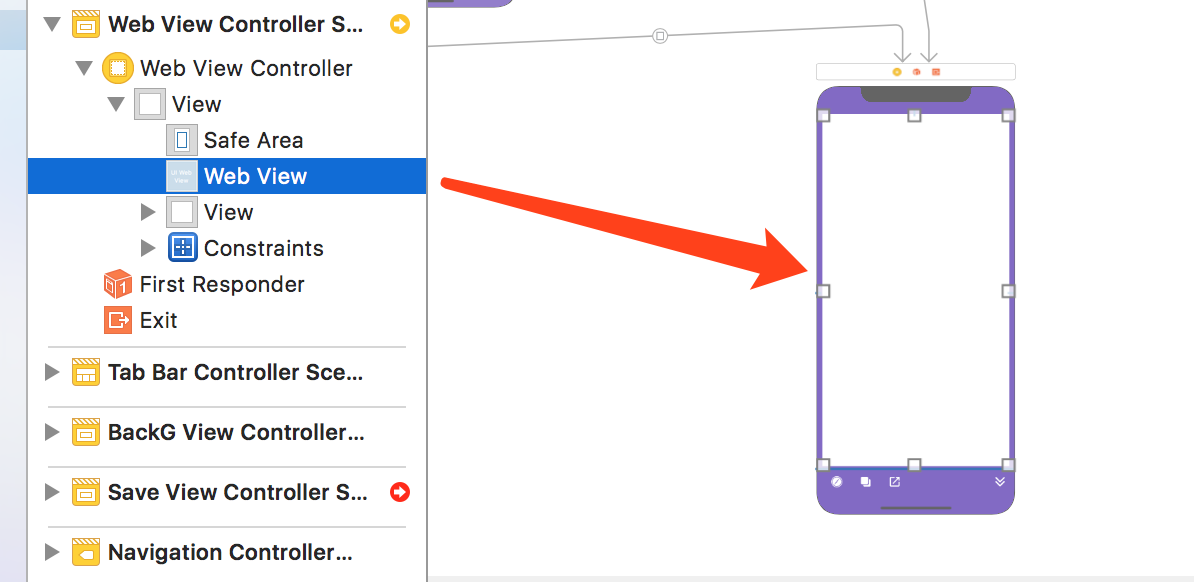
这个功能我们需要创建一个承载网页内容的Web页面,因此需要先添加带有WebView的Controller。 在其他页面打开Web时,通过传递参数来告诉WebView具体呈现哪一个网址。
例如在OneDay的WebViewController中:
override func viewDidLoad() {
 super.viewDidLoad()

 // Do any additional setup after loading the view.
 switch webIndex {
 case 0:
  self.urlString = "https://weibo.com/bujidehang"
 case 1:
  self.urlString = "http://www.ohweonline.com/oneday"
 case 2:
  self.urlString = "http://www.ohweonline.com/oneday/updateCN.html"
 case 3:
  self.urlString = "http://www.ohweonline.com/oneday/updateEN.html"
 default:
  self.urlString = "http://www.ohweonline.com/oneday"
 }

 let urlobj = URL(string:self.urlString)
 let request = URLRequest(url:urlobj!)
 webView.loadRequest(request)
 print(webView.isLoading)
}
在设置页面中,我们开始打开Web:
print("to webview")
self.webIndex = 1
self.performSegue(withIdentifier: "viewWebView", sender: self)
将WebIndex传递给WebViewController,以方便判断具体的网址。
override func prepare(for segue: UIStoryboardSegue, sender: Any?) {
 if segue.identifier == "viewWebView"{
  let dest = segue.destination as! WebViewController
  dest.webIndex = self.webIndex
 }
}
这样就实现了所有相关网址的打开。实际在网页加载页面中还有一些特性和功能,将在下一期文章中详细说明。 打开网址
总结
以上就是这篇文章的全部内容了,希望本文的内容对大家的学习或者工作具有一定的参考学习价值,如果有疑问大家可以留言交流,谢谢大家对移动开发之家的支持。
用户评论